It can be found at Pottery Barn Kids for $149. With tax and shipping, it was going to cost me around $170. Ridic right?
Well, I almost bought it. Because I really just adore it and that's exactly what I want. But, there's a part of me that was definitely saying "you can make that". So with a little blog help and much exploring on Pinterest, I had my plan. Before I show you how I did it. Lemme show you how it came out. It's not up in the bathroom yet because we're tiling our tub surround this weekend and I don't want it to get dirty. So you'll have to wait and see it up once the bathroom is complete. You have to practice patience right along with me :)

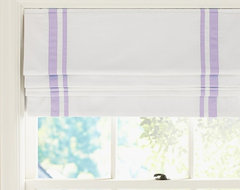
Excuse my appearance. In this picture, it looks like you can see the blinds through the fabric. But in person you can't. And I think with a patterned fabric, you wouldn't be able to see anything! You like? Yes, no? Looking similar to the Pottery Barn version?
Budget breakdown (& materials needed):
Vinyl mini-blinds - $3.97
Fabri-tac - $8.63
Fabric - $15
Ribbon - $1.50
Scissors
Iron
Patience
Total = $29.10
First, you take your mini-blinds out of the box and lay them out extended all the way. This is when your window measurements come in handy. In my case, my window was 42 inches long. Why is that important? Because you have to remove the slats of the mini-blind. Since my shade will be 42 inches long, I would be leaving 5 slats connected spaced out every 7 inches.

Then you pop off these little buttons on the bottom piece of your blind. I used a screwdriver but you could use your scissors.


Then you pop off these little buttons on the bottom piece of your blind. I used a screwdriver but you could use your scissors.

Once you get the little button off, there will be the bottom of your pull cord inside. You take the knot out and take off the bottom bar. You'll reattach later.


This all sounded so confusing to me when I was reading up on how to do it. Now for the fun part. Taking the mini-blind apart. What you need to do is clip out allllllll the ladder cords. DO NOT cut the pull cord.

In my case, I was leaving 5 slats because of the length of my shade. So I took out all the slats except for 5. The slip right off. Notice there are only two strings hanging on either side. No middle string at all and no more ladders.


The bottom bar is back on. To reattach all you do is tie new knots to the bottom and reattach the buttons.
Time to bust out the fabric! You want to leave above 2 inches of extra fabric around the perimeter of your mini-blind (so you can make your hem). So my exact measurements of my window were 26x42, so I cut my fabric around 28x44.
Next, I ironed my entire piece of fabric and then ironed the hem. I ironed about a 1.5 inch hem. This is where you can kind of gauge on your own to see how big your hem needs to be. You just don't want the mini-blinds to hang out the side of the fabric. So I'd leave at least a half inch of fabric on the sides once hemmed.
I tried to take pictures of myself ironing and hemming. This is what happened.... Put camera down Eris.


I tried to take pictures of myself ironing and hemming. This is what happened.... Put camera down Eris.

This next picture is once the fabric was all hemmed and ready to go. To achieve this hem, you can definitely sew. I don't know how to sew, and don't really care to learn. I used the Fabri-Tac to glue everything together. It works like a charm!

Then you glue your ribbon on if you are adding an embellishment.

Then you flip the fabric over and glue everything in place. So, basically you plop this next picture (from above) on top of the fabric.

You put the glue on the convex side of the mini-blind (the side that makes the arch). Glue the top and bottom bars into place and wait for it to dry. Make sure you don't get any glue on the pull cord. And you're done!
Sound difficult? It wasn't. It was a lot for me to wrap my head around at first, but once you actually do it, it all makes sense. Good luck :)
P.S. I don't wanna jinx anything, but next week you should see a FINISHED BATHROOM!! Woooo!


Ugh, cliffy! How did it turn out? You saved $150? That’s a lot! I’d like to see if you got what you wanted with those savings. The process looks difficult, but a little patience and effort was well worth the savings. =) Roxie @ WindowTreatmentsPhiladelphia.com
ReplyDeleteNice - is it still working - Recommend you use blockout fabric next time and maybe a PVC like material so easy for cleaning especially in a bathroom - Here are some frabric ranges to view.
ReplyDeletehttp://www.blindsdirect.co.za/pROLLSTYLE/Roller---Stylish-Fabrics.aspx
Amazing! That would really save you a lot of money rather than buying the 170-dollar ones. Thank you so much for sharing the instructions, by the way. I think you gave really clear details on the whole procedure. I’m excited to see how it turned out.
ReplyDeleteGreg Arnett
This article is very helpful. Just take a look on the following link to know more information about Mini Blind Cleaning .
ReplyDeleteYou are exploring the DIY drop-cloth curtain field well. Haha! Thanks for sharing your latest DIY window treatments discovery. I hope its end result fit well with your then newly-renovated bathroom. How did that turn out, by the way?
ReplyDeleteSteve Walton @ Blinds Shop Online